Mr. Johnson


“Where the classroom meets the real world”
WELCOME TO MY CLASS!
Graphic Design & Commercial Art
Graphic Design
Lesson 2, Assignment 2 - Abstract Your Face
Abstract Your Face in Photoshop!
Learn About:
-
Marquee Tool
-
Free Transform Distortion
-
Blending Options
All video clips and images on this page courtesy of digitalartanddesign.org. 2014.
STEP #1
Use Photo Booth (not Photoshop) to take a picture of yourself.
(See Lesson 2, Hidden Faces if you forgot how).
Drag your picture to the Desktop and then open it in Photoshop.
Use the CROP TOOL to select just your face.
Let go of the mouse and press Return.
Select the Rectangular Marquee Tool.
Make sure you have the ".jpg" at the end.
Log into Moodle and upload your file from the desktop to Moodle under Lesson2, Assignment2.

Press Control (not Command) and click and select Layer via Copy
or hit the keyboard shortcut: Command(⌘) + J …
… notice you now have a new layer.


Drag a box across part of your face.


STEP #2
Transform the Layer
and Add Effects
Go to: Edit > Transform > Perspective …
Grab a corner and pinch or squeeze a little.
When you finish and have it the way you like, hit RETURN to set it.

STEP #3
Layer Styles
Click on the Fx at the bottom of the Layers Palette …


… try Inner Shadow, Inner Glow & Drop Shadow or anything else you want.
Repeat this as many times as you want!
STEP #4
Again...
Make sure the layer with your face is selected.
Draw another rectangle around a different part of your face and make a copy …

… hit the keyboard shortcut: Command(⌘) + T, only this time, hold Command(⌘) while you distort the selection.
Do this over and over until you get the effect your want.

STEP #5
Blur the Background
Press CONTROL and click on the bottom background layer and choose Duplicate Layer …
… then click on the DUPLICATE LAYER …
… and go to: Filter > Blur > Box Blur. Click OK.


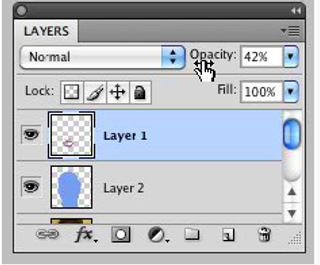
STEP #6
Opacity (how see-through it is)
Lower the Opacity of the new background layer …
… and finally, scroll through the Blending Modes and pick one that looks right to you …
Try setting the Blending Mode to Difference or any other blending mode you like …

LAST STEP
SAVE AS A .JPG
Go to: File > Save for Web and save it as a .jpg
Save it to the DESKTOP as a .jpg about 500 pixels wide
named as: PeriodNumber-LastName-FirstName-Lesson2Assignment2.jpg