Mr. Johnson


“Where the classroom meets the real world”
WELCOME TO MY CLASS!
Graphic Design & Commercial Art
Graphic Design
Lesson 13 - Flash: Animate a Stick Figure
Fun Animation Using Flash
Step #1
Learn the basics of Frame by Frame animation. Also learn how to make a movie clip move across the screen using a Motion Tween.
Draw a body and arms & legs too.
First, open up Flash by clicking the icon that looks like this:
At the first screen you see, choose ActionScript 3.0

This makes your "Stage", just like Photoshop's Canvas.
This is the area that you will be working on.
Click WINDOW and choose WORKSPACE.

WINDOW
WORKSPACE
Step #2
Open Properties (If you don't see Properties, hit the keyboard shortcut Command(⌘) + F3 or go to: Window > Properties.)
Raise the Smoothing level.
The higher the smoothing number, the better your drawing will look.
-
You can reshape lines using the Selection Tool (the BLACK ARROW).
-
Just grab the edges and drag!
-
Adjusting lines is one of the great benefits of Vector Graphics in Flash.
Create a Movie Clip!
Step #4
...Fill in your head!
Select your drawing by clicking on the Layer or hit the
keyboard shortcut: Command(⌘) + A or go to: Edit > Select All.
Hit fn + F8.
Convert your Stick Man into a Movie Clip!
Name it "walking man".
You can save your work as a .FLA file into the
GRAPHIC DESIGN: Stick Figure.
Just name it stick figure.fla.

Make sure "CLASSIC" is chosen.
CLASSIC
Select the BRUSH TOOL.


Draw with the Brush!
Draw a head on the stage.
Adjusting Lines and Fill
Step #3
-
Also, you can fill in the head by getting the Paint Bucket or just hit the letter (K)
-
… and picking a Fill Color from the color palette


Double-click on the symbol with the Selection Tool to open it
Open the Movie Clip!
Step #5
You are now inside a "movie within a movie"!

Click fn + F6
Keyframes & Onion Skin!
Step #6

fn + F6 creates a new Keyframe.
Click the ONION SKIN button.
This allows you to see the outline of all the frames.

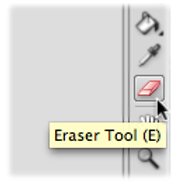
Get the Eraser Tool or hit the keyboard shortcut letter (e).
Making your Movie Clip walk.
Step #7

Erase the leg!
Draw a new leg a little farther beyond the old one …
… and do the back leg too.
Redraw the Leg!
Step #8
Erase the arms and move them too …
Don't Forget the Arms!
Step #9
Click fn + F6 again.
You now have 3 Frames.
Repeat the Process!
Step #10

Erase both legs and draw them again further out!
Don't forget the arms!

Click fn + F6 a third time.
Begin to draw the legs going back the other way.
Now Make the Legs go Backwards!
Step #11
Do the same to the arms!

Click fn + F6 a fourth time and move the legs back again.
Again with the Backwards!
Step #12
Repeat this as many times as necessary to get
a normal looking walking speed.

Hit COMMAND + RETURN (ENTER) to see your work.
De-Select the Onion Skin button.
Click on Scene 1 in the menu bar …
Motion Tween.
Step #13

and drag the movie clip just off screen to the left side of the stage.
Then go out to approximately Frame 40, and hit fn + F6 to Insert a Keyframe.
Move the movie clip to the other side of the stage.
CONTROL + CLICK between the two frames and select Create Classic Tween.
You should see an arrow between the two keyframes
if the motion tween works correctly.

Hit COMMAND + RETURN (ENTER) to see your work.
Add a new layer and drag it underneath the character layer and draw a background for your character to walk on! Use the paintbrush and paintbucket tools and experiment with how they work.
You can save your work as a .FLA file into the
GRAPHIC DESIGN: Stick Figure.
Just name it stick figure.fla.
Show it to me before you submit it for grading!