Mr. Johnson


“Where the classroom meets the real world”
WELCOME TO MY CLASS!
Graphic Design & Commercial Art
Graphic Design
Lesson 12 - Flash: Follow the Bouncing Ball
Simple Animation Using Flash
Step #1
Flash is a powerful animation tool. But you have to start simple before you can build on that. This is a lesson on how to create a bouncing ball with Flash!
You will also learn a few new parts of Flash that will be new. Ask a friend or
Mr. Johnson if you get confused.
-
Select a color of your choice from the Fill color picker, located directly below the Stroke color picker (bottom left of the screen).
First, open up Flash by clicking the icon that looks like this:
At the first screen you see, choose ActionScript 3.0

This makes your "Stage", just like Photoshop's Canvas.
This is the area that you will be working on.
Click WINDOW and choose WORKSPACE.

WINDOW
WORKSPACE
Step #2
OK, it's time to get the ball rolling, er, I mean Bouncing! Follow along carefully.
I will write what to do and show you in the graphic below.
Drawing a circle on the Stage
Drawing shapes is a common thing in Flash.
When you use the drawing tools in the Tools panel, the graphics you create can be edited at any time. These are called VECTOR graphics.
The following steps describe how to create a circle. Later, you'll use this circle to create some basic animation. Follow these steps:
-
Select the Oval tool from the Tools panel.
Use the stroke color swatch in the Property inspector to select the No Color option (red diagonal stripe) from the Stroke Color Picker.
-
While the Oval tool still selected, press and hold the Shift key.
-
Draw a circle on the Stage by Shift-dragging on the Stage.
When you press and hold the Shift key while drawing or transforming a shape with the Oval tool, Flash keeps the Oval tool shape to a circle that is perfectly round.
Note: The Shift key works similarly with other auto shapes; when you press and hold Shift while drawing a shape with the Rectangle tool, you'll create a perfect square.
Creating a Symbol and Adding Animation!
Step #3
After drawing some artwork, you should turn it into a symbol.
A symbol can be reused anywhere in your document without the need to re-create it.
It is usual to use symbols to create animations.
Click the Selection tool in the Tools panel.
Click the circle on the Stage to select it.
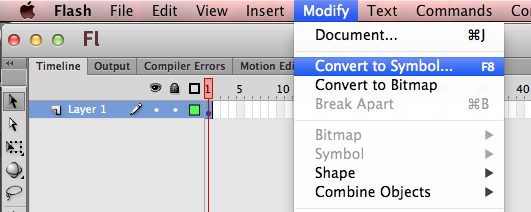
While the circle is still selected, choose Modify > Convert to Symbol (or press fn + F8) to access the Convert to Symbol dialog box.
Enter the name of the symbol in the Name field (my_circle).
Use the Type menu to select the Movie Clip option.
Click OK.
A square bounding box is displayed around the circle symbol.
You've just created a reusable asset, called a symbol, in your document.
In this case, you created a movie clip symbol named my_circle.
Animating the circle
In this section, you'll use the symbol in your document to create
a basic animation that moves across the Stage!
Step #4
You can save your work as a .FLA file into the
GRAPHIC DESIGN: BOUNCING BALL spot on MOODLE.
Just name it bouncingball.fla.
DO NOT SUBMIT THIS! YOU WILL USE IT IN LESSON 12, PART 2!

Make sure "CLASSIC" is chosen.
CLASSIC
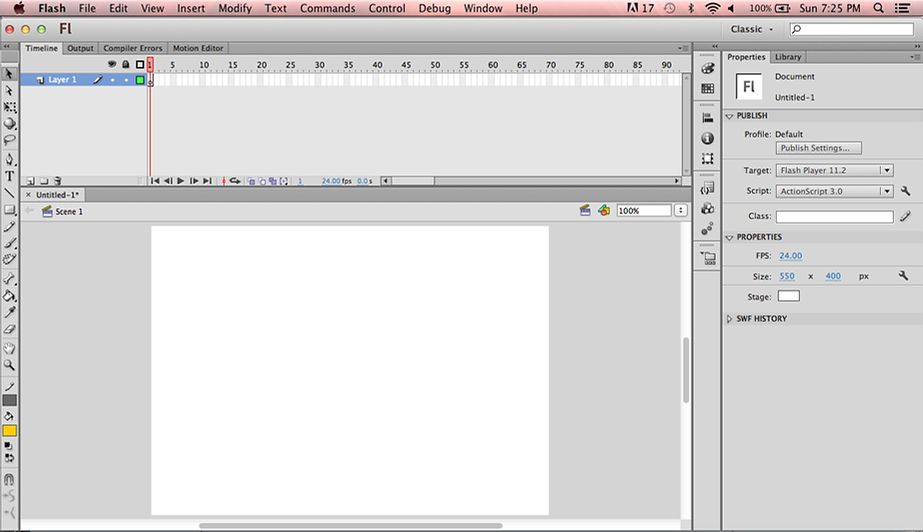
TOOLBAR
You will see a "TOOLBAR" similar to the one in Photoshop.
You can mouse over each tool to see what it's called.
You will also see something new, call the "TIMELINE".
The TIMELINE has LAYERS, similar to the LAYERS in Photoshop.
This is where you make the ANIMATION happen.
The TIMELINE controls when and for how long something happens on the STAGE.
Select the circle on the Stage and drag it off the Stage area to the left.
TIMELINE


CLICK THIS SQUARE AND CHOOSE THE BOX WITH THE RED STRIPE.

CLICK THIS SQUARE AND CHOOSE A COLOR FOR YOUR CIRCLE.


If the Library panel is not open, choose Window > Library to access it.
The new symbol is now listed in the Library panel.
(When you drag a copy of the symbol from the Library panel to the Stage,
the copy on the Stage is called an instance of the symbol.)


CONTROL + CLICK the circle on the Stage
and choose the option to Create Motion Tween in the menu that appears.
Notice that the Timeline is automatically extended to Frame 24 and the red marker (the current frame indicator, also known as the playhead) moves to Frame 24.
This tells you that the Timeline is ready for you to edit
the ending location of the symbol (the circle) and create a one-second animation.


Frame 24
on the TIMELINE
While the playhead is still on Frame 24 of the Timeline, select the circle on the Stage and drag it to the right, just past the Stage area.
This step of moving the circle creates a tweened animation.
On Frame 24, notice the diamond-shaped dot (known as a property keyframe) that appears.
On the Stage, also notice the motion guide that indicates the circle's path of motion
between Frame 1 and Frame 24
The red rectangle is called the PLAYHEAD. It shows where in your animation you are!


Diamond
Shaped Dot
MOTION GUIDE
In the Timeline, drag the red playhead back and forth from Frame 1 to Frame 24
to preview the animation; this is known as scrubbing the Timeline.

DRAG PLAYHEAD BACK AND FORTH
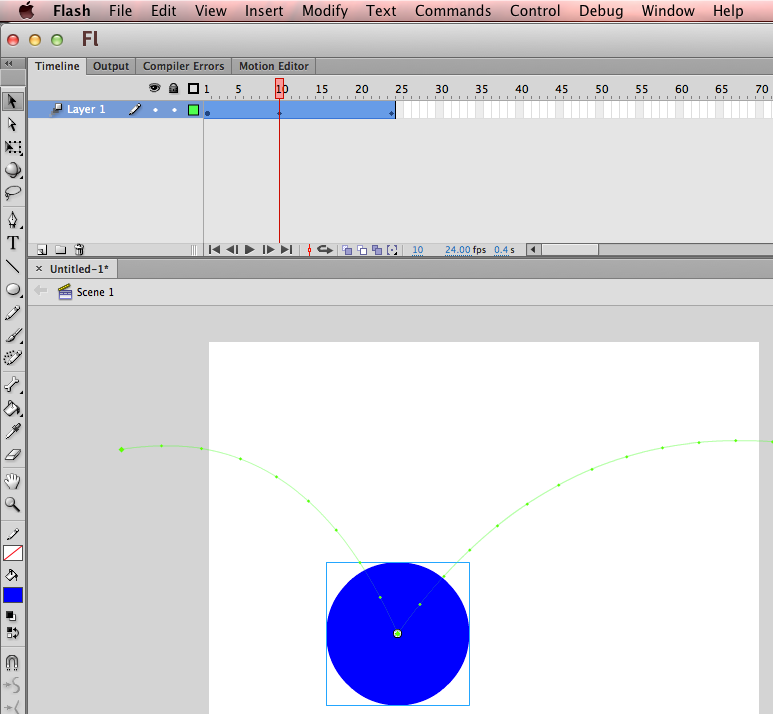
You can change the circle's direction in the middle of the animation.
First, drag the playhead to Frame 10 in the Timeline.
Then select the circle and move it to another location, further down on the Stage.
Notice that the change is reflected in the motion guide and the new dot (property keyframe) appears on Frame 10 of the Timeline.

PULL CIRCLE DOWN
MOVE PLAYHEAD TO FRAME 10
Experiment with editing the animation by changing the shape of the motion guide path.
Click the Selection tool in the Tools panel and then click a section of the motion guide line. Drag it to bend the line shape.
When you bend the motion path, you cause the animation
to follow along a smooth curved line instead of a rigid straight line.
Click and Drag Up
Click and Drag Up
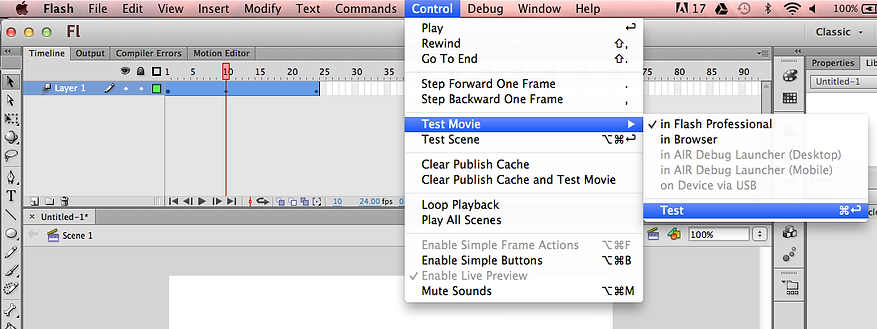
Choose Control > Test Movie>Test to test the FLA (FLASH) file
and watch the animation play back in Flash Player.
The movie loops automatically, so you can watch the circle move across the window repeatedly. When you are finished, close the Test Movie window.
Follow the steps below to add ActionScript code to your FLA (Flash) file. You'll add one of the most common Timeline commands, which is called the STOP action!
Using a stop action to stop the Timeline from looping
You noticed that the animation loops as the movie plays
in Flash Player. This occurs automatically because in Flash, the Timeline
is set up to loop back to Frame 1 after exiting the last frame—unless you
tell the movie to do something else.
When you want to add a command that controls the Timeline (remember,
the Timeline is where you tell the animations what to do!), you'll add ActionScript code to a keyframe (indicated by a dot symbol) on the Timeline.
This is known as adding a frame script.
Step #5
It's always a good idea to name your layers if you have more than one.
A large project can quickly become confusing if its layers are not named.
Double-click the name to rename Layer 1.
In the field that appears, enter the new name: animation.
Click the New Layer button (page icon) in the lower left of the Timeline panel.
The ActionScript code must be added to the Timeline.
It's considered best practice to create a layer named actions
at the top of the layer stack, dedicated to holding the ActionScript code.
Rename the new layer you just created to: actionscript.
Make sure it is located above the animation layer.
Now that you've created a layer to place your scripts, you can add keyframes
to the actions layer to associate the ActionScript code with specific frames.
Move the playhead to Frame 24. Click the actions layer at Frame 24
(to highlight the last frame on the actionscript layer).
Insert a keyframe on Frame 24 of the actions layer by choosing
Insert > Timeline > Keyframe (or pressing fn + F6).
Notice that an empty, blank keyframe appears
(you can tell that the new keyframe doesn't contain any graphics because the dot icon for the keyframe is hollow, rather than displaying a solid color).
The Actions panel contains the Script window, which is a large text field you'll use to type or paste ActionScript code directly into your FLA file. Place your cursor in the text area next to the number 1 (line 1) and type in the following action:
stop();
Then click the small x on the top left of the Actions panel.


NEW LAYER BUTTON


FRAME 24


SMALL X
After typing the line of ActionScript code in the Script window, you'll notice that a little "a" icon appears above the keyframe in the actions layer of the Timeline.
This indicates that the keyframe contains a frame script (also known as an action).
Choose Control > Test Movie>Test to test the FLA file and watch it play in Flash Player.
Notice that this time, the animation doesn't loop.
You can return to Flash and test the movie again to watch the movie play again.

SMALL "a"
Select the new keyframe with the Selection tool.
Open the Actions panel (Window > Actions).