Mr. Johnson


“Where the classroom meets the real world”
WELCOME TO MY CLASS!
Graphic Design & Commercial Art
Commercial Art
Lesson 5 - The Crop Tool and Hue & Saturation
Create Your Cartoon Face!
-
This lesson will introduce you to the Crop Tool, Hue & Saturation, and how to save as a .jpg file
-
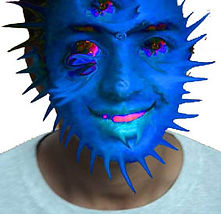
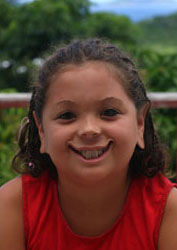
You will take a photo of yourself and turn it into a cartoon-like face!
Here are some examples of what others have done with this lesson!
All video clips and images on this page courtesy of digitalartanddesign.org. 2014.
STEP #1
Take a snapshot of your face with Photo Booth
-
Open Photo Booth (NOT Photoshop!) by pressing
Command (⌘) + the spacebar. -
Type in the letters "phot" and you will see Photo Booth appear as an option.
-
Click on Photo Booth
-
Take a picture of your face by looking at the screen and clicking the red button near the bottom of the screen. There will be a 3 second countdown before your picture is taken.
-
Drag the picture you like from the bottom of Photo Booth into Photoshop.
STEP #2
The Crop Tool
Get the Crop Tool or hit the keyboard shortcut letter (c) …
Crop your photo so that just your head and shoulders are showing.
Hold the mouse button down and select the area you want to keep.
Hit Return (Enter) to crop the picture.
STEP #4
Add to or Subtract from Selection
To Add (or take away from) your image, select the Lasso Tool or hit the keyboard shortcut letter (L).
… on the Menu Bar, you can set Add to Selection or Subtract from Selection ...
And outline the area that you want to add.
Or if you want to Subtract from the selection...
STEP #3
The Magnetic Lasso Tool
Now choose the Magnetic Lasso Tool.
Hold down the mouse button on the Lasso Tool and you will see a pop up with the Magnetic Lasso Tool.

STEP #5
Create a New Layer
HIt COMMAND + J to copy the layer.


Click the mouse button on the outside edge of your face, let go and drag a little, click on the next spot, let go and drag, until your whole face and shoulders are outlined.
When everything is outlined, double click to complete the outline.
HINT: Take your time. If you make a mistake, hit the DELETE key and it will take you back one step.


Circle the area you want to remove.

Click on the Windows Menu at the top of the screen and pick Layers about halfway down.
This will bring up the Layers Palette.
NOTE: THE LAYERS PALETTE MAY ALREADY BE OPEN. CHECK BEFORE DOING THIS STEP!

In the Layers Palette, you can now see 2 layers, one of just your selected area and the other the background layer.

Notice the Background layer is locked.
Get rid of it by clicking on it, holding the mouse button down, and drag it into the trash.
STEP #6
The Liquify Filter
Go to Filter > Liquify on the top menu.

Choose the Forward Warp Tool.

Change the Brush Size if necessary.

… try pushing the eye brow up in the middle without changing the eye yet.
Position the mouse button like on the picture. Make sure the brush is the right size. Hold down the mouse button and "Push" up.

It's easy to overdo it with the Liquify Tool, so you can always hit Reconstruct or Restore All if needed.
If you like the image so far, click OK.

Go back to: Filters > Liquify and try the Bloat Tool …

… make the brush size slightly bigger than your eye.

Hold down your mouse button over your eye to see what happens!

Get the Pucker Tool.

Pucker your nose a little.
Remember to click OK each time you get your image to a place that you like it; otherwise you will lose those changes when and if you click on revert.

Using these 3 tools: Pucker, Bloat and Warp,
try adjusting other parts of your face.
STEP #7
Change Your Skin Color!
Using the Magic Wand tool click on your forehead. Hold the Control key and click on your face and choose Grow. If you are lucky you will now have all of your skin selected.

If necessary, select Add to Selection in the menu bar...
… and continue to click on any remaining skin that is showing.

Use the Lasso Tool for areas such as teeth or parts of your hair to Subtract from selection...

… then go to: Image > Adjustments > Hue/Saturation.

Drag the hue marker to the left and right to see your skin color change.

Click on OK when you have it the color that you want.
Then hit the keyboard shortcut Cmd (⌘) + D to Deselect. This is a useful shortcut to remember!
Mess around with other parts of the image.
Be sure to save your work before you change too much.

Change the hair color by using the same method:
Hue and saturation, changing the hue as well as the saturation bar.

LAST STEP
Save the file as Your Name! so I know who it is!
Go to: File > Save for Web & Devices and save it as a .jpg
Save it as a .jpg approximately 500 pixels wide.
Save it to the Desktop so that you can load it upload to Moodle under Lesson 5.
Save the file as YOUR NAME! so I know whose it is.
THAT'S IT FOR THIS LESSON!