Mr. Johnson


“Where the classroom meets the real world”
WELCOME TO MY CLASS!
Graphic Design & Commercial Art
Commercial Art
Lesson 4 - Feathering, Free Transform, and The Lasso Tool
Create a Feathered Collage in Photoshop
-
This lesson can be useful for creating any kind of collage (putting a bunch of pictures together into one)
in Photoshop. And a ton of other things! -
Collect multiple images onto one document and use Feathering to make them blend together.
For this lesson we are going to use some
Renaissance art. Renaissance was a unique style of art that came out of Italy in about 1400.
All video clips and images on this page courtesy of digitalartanddesign.org. 2014.
STEP #1
Create a blank document (called a canvas)
in PhotoShop
Open PhotoShop & create a new canvas.
Hit Command (⌘) + N
Or choose File>New


+
Select inches
Make your canvas 10 x 16 inches
(The size of a large piece of paper).
Look at the settings in the picture here.

It's a good idea to choose Transparent
in the Background Contents, too.
STEP #2
Find images for your collage
Go to google.com and Search images for Renaissance Art …
(OK, so you don't have to use Renaissance Art... you can find your own images if you want).
Don't worry about how to spell it, just copy and paste it from above!

Open some of the images in PhotoShop.
Hold down the Control button and click.
Choose Copy Image.
Paste into the new canvas by going to: Edit > Paste or hit: Command (⌘) + V.
STEP #3
Free Transform
You may be asking, "How can I make it Bigger?"
Hit Command (⌘) +T or go to: Edit > Free Transform
STEP #5
The Lasso Tool
Get the Lasso Tool or hit the keyboard shortcut letter (L).
Here's a hint. Instead of the "round" Lasso Tool, if you hold the mouse button down on the lasso, choose the Polygonal Lasso Tool instead. Try both!
Use the Lasso to draw around the part of the image you want. If you want to use the Polygonal Lasso, click on a spot, let go and drag a little bit, click again, let go and drag, click again, let go and drag - until you have what you want selected. When you are done, double click and your selection should be ready!
STEP #4
The Shift Key
If you hold while you drag the corners, it changes all sides of the picture at once.
Try it! See for yourself what it does …

Last Step
Save Your Work
Go to File > Save As
Save your files to the desktop named as: PeriodNumber-LastName-FirstName-Lesson4.psd
Make sure you have the ".psd" at the end or you will not be able to open your file next time.
Log into Moodle and upload your file from the desktop to Moodle under Lesson 4.


STEP #6
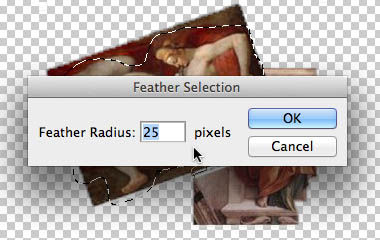
Feathering
Go to: Select > Modify > Feather and set the Feather Radius to whatever works for you …
You don't have to use 25. If you're not sure what the Feather Radius should be, just try it and see.
You can always undo it and try again …
STEP #7
Select Inverse
Now select the inverse (the opposite of what you selected) by going to Select > Inverse or hitting:


+ + I
Then hit Delete and the feathered area should disappear leaving a smooth transition between the two images instead of a rough edge.
