Mr. Johnson


“Where the classroom meets the real world”
WELCOME TO MY CLASS!
Graphic Design & Commercial Art
Commercial Art
Lesson 3 - Using Brushes
Brushes in Photoshop
Remember: Always Be Creative! Try different things!
Learn About
Different types of brushes
Brush "Opacity" (How much you can see through it.)
Shape Dynamics
All video clips and images on this page courtesy of digitalartanddesign.org. 2014.
Set your Brush to a Hard Edged small brush …
You can change the size of the brush by hitting the left or right bracket keys (right below the Delete key.)
… lower the Opacity (how much you can see through it) of the brush to around 20%.
Last Step
I set up a spot in Moodle to save any work in progress. But there is no required work to submit.
STEP #3
Set Up Your Brush
Click the Brush Tool or hit the keybord shortcut letter (B) …

STEP #1
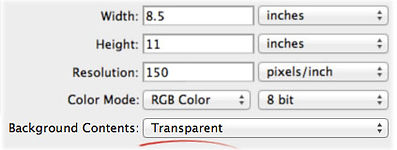
Create a blank document (called a canvas)
in PhotoShop
Open PhotoShop & create a new canvas.
Hit Command (⌘) + N
Or choose File>New
+


Select inches
It's a good idea to choose Transparent
in the Background Contents, too.
Make your canvas 8.5 x 11 inches
(The size of a piece of paper).

STEP #2
Choose your Brush Color
Find the Set Foreground Color Square at the bottom of the toolbar.
Then Change The Color by sliding the little circle around with your mouse.


STEP #4
Shape Dynamics
Hit F5 or click on the Toggle the Brushes panel button (at the top of the program, by the menu bar.
Click Shape Dynamics.


Set the Jitter Control to Fade.

Set the Number of Steps for the Fade.

STEP #5
New Layers
Go to: Layer > New > Layer …

… or hit the keyboard shortcut: Cmd (⌘)+ Shift +N …


+ +
… and hit OK …

Fill the new layer with white so you can see what you're doing by going to: Edit > Fill …

Then make ANOTHER NEW LAYER: Layer > New > Layer … above that …

Play around with the paintbrush on the top layer. Hold down the mouse button and draw!
Try out different brushes, brush settings, and colors. Don't worry, you can't do anything wrong by experimenting!
