Mr. Johnson


“Where the classroom meets the real world”
WELCOME TO MY CLASS!
Graphic Design & Commercial Art
Commercial Art
Lesson 2, part 2 - Using Text
Using Text in Photoshop
This is a really cool tool you can use in lots of ways!
All video clips and images on this page courtesy of digitalartanddesign.org. 2014.
STEP #1
Create a blank document (called a canvas)
in PhotoShop
Open PhotoShop & create a new canvas.
Hit Command (⌘) + N
Or choose File>New


+
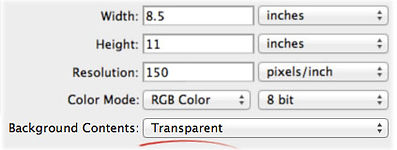
Select inches
Make your canvas 8.5 x 11 inches
(The size of a piece of paper).
Change the Resolution to 150 pixels/inch.

It's a good idea to choose Transparent
in the Background Contents, too.
STEP #2
Choose the Text Tool
Select the Horizontal Type Tool (or Text Tool) or hit the keyboard shortcut (t) …
… hold down the mouse button, click once, and then type YOUR NAME (your actual name, not the words "your name"!) in all CAPS.
If your name is small, don't worry about it, you will make it larger in Step #3!
STEP #3
Select Your Font
Make sure the "T" tool is still selected. Mouse over your text until the cursor changes. Hold down the mouse button and drag to select your text.
… click on the Font Family in the menu bar …
Scroll down through the fonts and select one that you like.
Then Change the Size of the font to fill up your canvas.
You can move the text around by using the Move Tool.
STEP #4
The Warp Tool
Warp your text by clicking on the "Create warped text " button in the Menu Bar …
Select from the options.
Choose a warp style and click OK.
Last Step
Save Your Work
Go to File > Save As
Save your files to the desktop named as: PeriodNumber-LastName-FirstName-Lesson2-Part2.psd
Make sure you have the ".psd" at the end or you will not be able to open your file next time.
Log into Moodle and upload your file from the desktop to Moodle under Lesson2 Part2.


STEP #5
Blending Options
Then go to: Layer > Layer Style > Outer Glow …
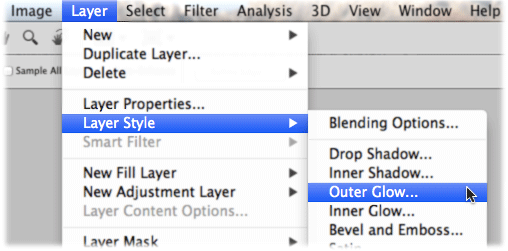
… and raise the size and spread of the glow so you can see the text clearly.

STEP #6
Bevel and Emboss
Next, add Bevel and Emboss …

… again, adjust the settings to make your text contrast against the background …
STEP #7
Drop Shadow
Add a little Drop Shadow …

… and try different Blending Options settings to create a unique style all your own.

Go to the Window menu and choose Character to have a Character Panel just for text appear.