Mr. Johnson


“Where the classroom meets the real world”
WELCOME TO MY CLASS!
Graphic Design & Commercial Art
Commercial Art
Lesson 1 - Basic Tools in Photoshop
The Basics in Photoshop
These are the tools you will use - ALWAYS!
Learn About
Move Tool
Zoom Tool
Free Transform Tool
All video clips and images on this page courtesy of digitalartanddesign.org. 2014.
STEP #1
Create a blank document (called a canvas)
in PhotoShop
Open PhotoShop & create a new canvas.
Hit Command (⌘) + N
Or choose File>New


+
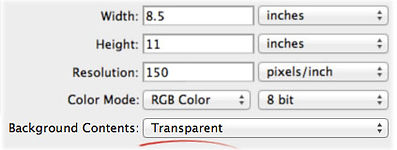
Select inches
Make your canvas 8.5 x 11 inches
(The size of a piece of paper).
Change the Resolution to 150 pixels/inch.

It's a good idea to choose Transparent
in the Background Contents, too.
STEP #2
Find an image
Go to google.com and find an interesting shoe that you like.
Type the word Shoe and choose Images at the top of the page.
Click on the shoe that you like.
On the right choose View Image to get the largest image size.

Hold down the Control button and click.
Choose Copy Image.

STEP #3
Paste it in Photoshop
Paste into the new canvas by going to: Edit > Paste
or hit: Command (⌘) + V.
STEP #4
The Move Tool
Select the Move Tool.

Adjust (or move) the image around the canvas.
STEP #5
Change the Size
Now, you may be asking, "How can I make it Bigger or Smaller?"
First you must Zoom Out. Select the Zoom Tool …

or click Zoom Out on the menu bar …
and click the image to zoom out.
STEP #6
Transform the Size
Hit Command (⌘) + t …
Hold Shift while dragging - it changes all sides of the picture at once.
When you are happy with your transformation, hit the Return key.

Last Step
Save Your Work
Go to File > Save As
Save your files to the desktop named as: PeriodNumber-LastName-FirstName-Lesson1.psd
Make sure you have the ".psd" at the end or you will not be able to open your file next time.
Log into Moodle and upload your file from the desktop to Moodle under Lesson1.